10 Jan How to Create Your Own Educational Games With TinyTap – Getting Started

Disclosure: This is sponsored content.
TinyTap is a great platform that I’ve been sharing with teachers since 2012, a full decade this fall. In that time I’ve seen it evolve from an iPad app for creating simple games to a full suite of tools for creating educational games to play on iPads, on Android devices, and in the web browser on your favorite computer including Chromebooks.
The latest update to TinyTap enables you to create educational games on your computer. Over the next few weeks I’ll be highlighting the many kinds of games you can create in the web browser version of TinyTap, how to make them, and some use cases for them. This week we’ll start with the basics of building and publishing your first game on TinyTap.
Getting Started – Creating Your First TinyTap Game
If you want to get a sense of how games are played before you create your first one, you can do so by simply going to TinyTap.com and trying one of the “editor’s choice” games. You can play any and all of those games in your web browser without creating an account, but you’ll get a better experience by creating a free TinyTap account.
When you browse through and play some of the editor’s choice games you’ll see that the simplest kind of game is an object identification game. Creating that kind of game is a great way to learn the basics of game creation on TinyTap.
To get started on the process of making a game you will need to sign-up for a free TinyTap account by clicking on the blue teacher icon, sign in, and then click the create button at the top of the screen. Once you do that you’ll see the game editor appear. Give your game a name (you can always change it later if needed) then you’re ready to add content to your game.
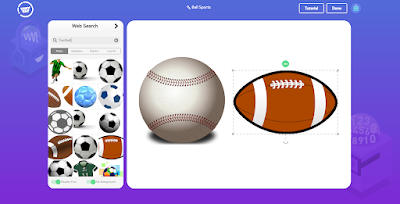
The process of creating a TinyTap game is much like creating a slide in PowerPoint or Google Slides. You can start by choosing one of the many slide designs or use just a blank slide design. After choosing a design, add a picture to the game. You can upload pictures or use the integrated search tool to find pictures to use in your game. In the example below, I’ve included a picture of a baseball and a picture of an American football. Both pictures were found through the integrated image search tool.
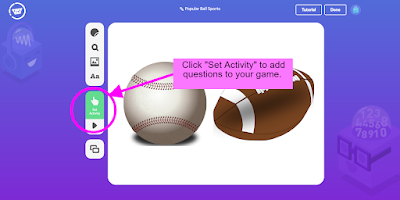
After adding an image or two, it’s time to create an activity for the game. To ask a question you’ll need to click on “set activity” (see screenshot below) then choose the type of activity you want to add to your game.
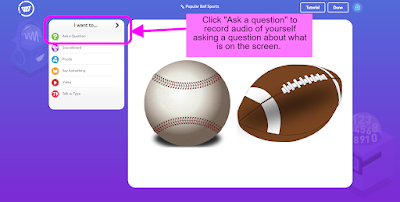
An easy first activity is to just ask a question. Clicking on “ask a question” will open an audio recorder. You can then record yourself asking a question about what is displayed on the screen (it’s also possible to upload an MP3 instead of recording in TinyTap). For example, in my game I asked the question, “which of these is used to play American football?”
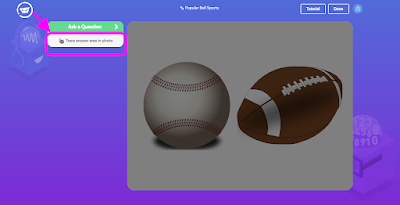
After recording your question(s) for your first activity you will need to identify the correct and incorrect answers. In my example of asking, “which of these is used to play American football?” I needed to indicate that the football is correct and the baseball is incorrect. To do that I simply clicked on the football then circled it with the tracing tool built into the TinyTap activity editor. (You can also use the tracing tool for squares and other geometric shapes). After circling the football I then used the recording tool in the TinyTap activity editor to say, “that’s correct, good job!” I also made a recording that said, “sorry, that’s a baseball” that plays when someone taps on the baseball.
Expanding Your First TinyTap Game
As I alluded to above, there is a lot more that you can do with TinyTap’s game creator than just make a one-slide identification game. I’d recommend at the very least adding an engaging title slide and a “say something” activity.
To add a title slide to my game I just clicked the new slide icon then selected a new style for it. The style selector gives you access to a wide selection of “creation packs” offered by TinyTap. In the screenshot below you can see where to access the creation packs and where to click to add more slides to your game.

To my title slide I added an activity type called “Say Something.” That activity type is simply a way for you to add your voice to the game. In this case I recorded myself saying “welcome to the game all about sports.” That audio plays back when students open the game.
My game now has a title slide, an audio introduction, and an identification question. Now I’ll add one more slide and another activity type. This time rather than tapping to identify their answer choices, students will type their answers. To create that kind of question I added a new slide and an image to it. In this case (seen in the screenshot below) I added a picture of a skier. I then selected the activity type of “Talk or Type” which allowed me to trace the skier and then ask the question, “is this a summer or winter sport?” When students see this question in the game they’ll type or speak their responses.

Publishing Your TinyTap Game
Before finishing the editing of your game you can preview it and play it as your students would. When you finish your game just click the “done” button and it is automatically saved in your TinyTap account. In your account dashboard you can choose to keep your game in draft mode (nobody but you can see it) or you can publish it and share it with your students.
A complete set of game creation tutorials is available by clicking “tutorial” in the upper-right corner of the game editor screen in TinyTap. I also made this short tutorial to demonstrate everything that is outlined above.
Applications for Education
TinyTap makes it easy to create engaging, educational games for your students to play at home or in your classroom. You can use the basic framework that I shared today to create identification games for topics in elementary school science and math lessons. For example, you could create a game in which students have to identify all of the mammals that appear on the screen. Another example is to create a game in which students identify shapes.
Thinking back to the days when I thought that I might want to be a music teacher, creating a TinyTap game in which students practice identifying whole notes, half notes, quarter notes, and eighth notes could be a fun way for them to practice reading music. Additionally, another way to use TinyTap for music lessons is to import images of musical instruments and have students practice identifying and “playing” them. Here’s one example and here’s another.Disclosure: This is sponsored content. TinyTap is a great platform that I’ve been sharing with teachers since 2012, a full decade this fall. In that time I’ve seen it evolve from an iPad app for creating simple games to a full suite of tools for creating educational games to play on iPads, on Android devices, and in the web browser on your favorite computer including Chromebooks. The latest update to TinyTap enables you to create educational games on your computer. Over the next few weeks I’ll be highlighting the many kinds of games you can create in the web browser version of TinyTap, how to make them, and some use cases for them. This week we’ll start with the basics of building and publishing your first game on TinyTap. Getting Started – Creating Your First TinyTap GameIf you want to get a sense of how games are played before you create your first one, you can do so by simply going to TinyTap.com and trying one of the “editor’s choice” games. You can play any and all of those games in your web browser without creating an account, but you’ll get a better experience by creating a free TinyTap account. When you browse through and play some of the editor’s choice games you’ll see that the simplest kind of game is an object identification game. Creating that kind of game is a great way to learn the basics of game creation on TinyTap. To get started on the process of making a game you will need to sign-up for a free TinyTap account by clicking on the blue teacher icon, sign in, and then click the create button at the top of the screen. Once you do that you’ll see the game editor appear. Give your game a name (you can always change it later if needed) then you’re ready to add content to your game. The process of creating a TinyTap game is much like creating a slide in PowerPoint or Google Slides. You can start by choosing one of the many slide designs or use just a blank slide design. After choosing a design, add a picture to the game. You can upload pictures or use the integrated search tool to find pictures to use in your game. In the example below, I’ve included a picture of a baseball and a picture of an American football. Both pictures were found through the integrated image search tool.After adding an image or two, it’s time to create an activity for the game. To ask a question you’ll need to click on “set activity” (see screenshot below) then choose the type of activity you want to add to your game.An easy first activity is to just ask a question. Clicking on “ask a question” will open an audio recorder. You can then record yourself asking a question about what is displayed on the screen (it’s also possible to upload an MP3 instead of recording in TinyTap). For example, in my game I asked the question, “which of these is used to play American football?”After recording your question(s) for your first activity you will need to identify the correct and incorrect answers. In my example of asking, “which of these is used to play American football?” I needed to indicate that the football is correct and the baseball is incorrect. To do that I simply clicked on the football then circled it with the tracing tool built into the TinyTap activity editor. (You can also use the tracing tool for squares and other geometric shapes). After circling the football I then used the recording tool in the TinyTap activity editor to say, “that’s correct, good job!” I also made a recording that said, “sorry, that’s a baseball” that plays when someone taps on the baseball. So far we’ve created just one question with two answer choices. You could create a slide that has more images and answer choices on it, TinyTap calls this a Soundboard activity. You can also create multiple slides to be published as part of the same game. That’s where TinyTap begins to shine. By adding more slides you begin to create a larger and better game experience for your students.Expanding Your First TinyTap GameAs I alluded to above, there is a lot more that you can do with TinyTap’s game creator than just make a one-slide identification game. I’d recommend at the very least adding an engaging title slide and a “say something” activity. To add a title slide to my game I just clicked the new slide icon then selected a new style for it. The style selector gives you access to a wide selection of “creation packs” offered by TinyTap. In the screenshot below you can see where to access the creation packs and where to click to add more slides to your game.To my title slide I added an activity type called “Say Something.” That activity type is simply a way for you to add your voice to the game. In this case I recorded myself saying “welcome to the game all about sports.” That audio plays back when students open the game. My game now has a title slide, an audio introduction, and an identification question. Now I’ll add one more slide and another activity type. This time rather than tapping to identify their answer choices, students will type their answers. To create that kind of question I added a new slide and an image to it. In this case (seen in the screenshot below) I added a picture of a skier. I then selected the activity type of “Talk or Type” which allowed me to trace the skier and then ask the question, “is this a summer or winter sport?” When students see this question in the game they’ll type or speak their responses. Publishing Your TinyTap GameBefore finishing the editing of your game you can preview it and play it as your students would. When you finish your game just click the “done” button and it is automatically saved in your TinyTap account. In your account dashboard you can choose to keep your game in draft mode (nobody but you can see it) or you can publish it and share it with your students. A complete set of game creation tutorials is available by clicking “tutorial” in the upper-right corner of the game editor screen in TinyTap. I also made this short tutorial to demonstrate everything that is outlined above. Applications for EducationTinyTap makes it easy to create engaging, educational games for your students to play at home or in your classroom. You can use the basic framework that I shared today to create identification games for topics in elementary school science and math lessons. For example, you could create a game in which students have to identify all of the mammals that appear on the screen. Another example is to create a game in which students identify shapes. Thinking back to the days when I thought that I might want to be a music teacher, creating a TinyTap game in which students practice identifying whole notes, half notes, quarter notes, and eighth notes could be a fun way for them to practice reading music. Additionally, another way to use TinyTap for music lessons is to import images of musical instruments and have students practice identifying and “playing” them. Here’s one example and here’s another.
Sorry, the comment form is closed at this time.