09 Mar Creating and Marketing Online Courses With TinyTap
Disclosure: TinyTap is currently an advertiser on FreeTech4Teachers.com
Reasons to Create TinyTap Courses for Sale
If you’re already using TinyTap to create educational games and courses for your students to use for free, it’s easy to also create courses for sale to others through TinyTap’s platform. You set the prices for your courses and you earn 80% of all revenue generated by your courses. That’s a much better percentage than other platforms that teachers use to sell courses and materials. And TinyTap doesn’t charge you anything to create courses for sale. In other words, they don’t earn anything from you and your courses unless you do.
In the last week fuel prices have skyrocketed in my area. Likewise, a trip to the grocery store costs a lot more than it did a year ago. I don’t know about you, but my salary hasn’t correspondingly increased. Creating and selling TinyTap courses could be a good way to cover the losses inflicted by inflation.
How to Create TinyTap Courses for Sale
The basics of creating a TinyTap course to sell are largely the same as they are for creating a free course. Those basics are covered in last week’s blog post and in this video that shows you how to create an online course in five minutes or less.
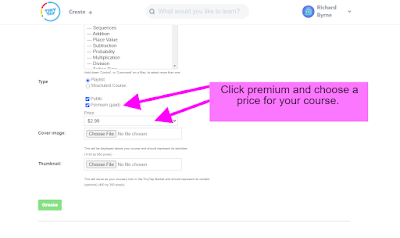
To develop a course to sell through TinyTap sign into your TinyTap account in your web browser then click “create course.” Then you’ll go through the simple steps of writing a course title, description, goals, identifying the target age for the course, and placing it into a content category. Those steps are the same whether the course is free or paid. If you want to sell your course, you’ll simply click the “premium” button and set a price before publishing your TinyTap course. See my screenshot below for more details.
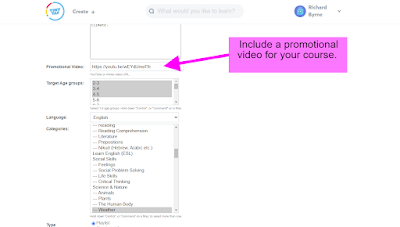
You may have noticed in last week’s blog post and tutorial video about creating courses that there is a field in the course builder where you can include a promotional video for your course. If you’re creating a course for sale, I’d highly recommend including a short promotional video. The video does need to be hosted on YouTube or Vimeo in order to include it in your course description. I’ll share more about creating promotional videos a little later in this post. For now, the screenshot below shows you where to place your video in the course builder.
Where Your Courses Are Sold
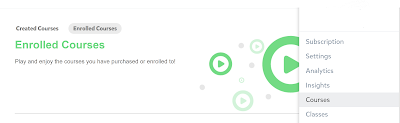
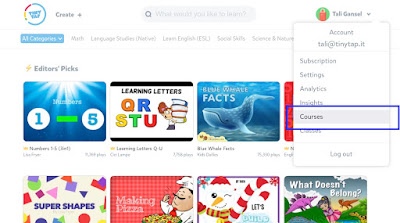
Courses that you mark as premium are available for anyone to purchase through Tiny Courses. Tiny Courses makes your course available for use in the web browser, on the Tiny Courses iPad app, and on the Tiny Courses Android app. While anyone could purchase a course, the target audience for Tiny Courses is parents who are looking for educational activities their children can do at home or anywhere they have access to Tiny Courses. The courses are a one-time purchase, access never expires, and there is a 30 day money-back guarantee. See the screenshot below for details on where purchased courses are found in the web browser at https://www.tinytap.com/reports/courses/purchased/
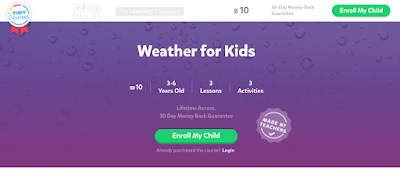
Every course that you create for sale through Tiny Courses is given its own Tiny Courses shop page. The great thing about the shop page is that it is generated for you from the information that you provide in the course builder including price, age range, number of activities, and general course information. You don’t have to worry about designing a page or dealing with the technical side of building an online shop because TinyTap does all of that for you. Take a look at this shop page for a course about seasons or this shop page for a course about the alphabet to get a sense of how the shop pages work.
I’ve created and sold online courses for the last decade. In fact, I’ve hosted courses about marketing teaching materials and online courses. Here are my three top tips for marketing courses that you create for sale.
- Create a video about your course. It doesn’t have to be fancy. It should be concise. People want to know the highlights of what they’re getting when they purchase your course. Create a 45-60 second screencast of your course’s highlights and at the end include a call to action like, “click enroll to get started.” I use Screencast-o-matic to create my videos, but there are other good choices like Screencastify, iMovie, and WeVideo available.
- Send email about your course offerings! I can’t stress enough how important a good email list is. Through your email list you can send messages to people who have expressed some level of interest in what you offer and direct them right to your course. This is so much more effective than posting on social media and hoping that the algorithm of the day puts your message in front of the right people.
- Important note about email: It should go without saying, but don’t use your school email address to email your students’ parents about courses you’re selling. Instead, build an email list outside of your school that people have opted into. Try a service like ConvertKit that lets you create landing pages for people to use to sign-up for your mailing list. ConvertKit’s free plan lets you have 1,000 email subscribers.
- Don’t be afraid to tell people about your courses. After a decade of selling courses, this is something that I’m still working on. Unless you’re a natural salesperson, you’re probably like me and a bit worried about being “that person” who is always selling something. The rule of thumb is that it takes at least seven touches to make a sale. In other words, sending one email or posting a few times on social media won’t get you the results you want. Use a variety of those methods to get those seven touches and then keep going because each new contact will also need seven touches before a sale.
- A note about sharing on social media: when you share a link to your course on social media a thumbnail image and description preview are automatically included by TinyTap.
Head to the course creator page to get started building a Tiny course to sell. Then click “get started” and log into your TinyTap account to build your course. Follow the steps I outlined in this tutorial but don’t forget to click “premium” to make your course available in Tiny Courses.
Watch this video to see how I would build and market a Tiny course for sale.
Learn More About TinyTap!
Over the last nine weeks I’ve shared a lot of information about creating educational games, lessons, and courses with TinyTap. All of those previous blog posts are listed below.
- Use TinyTap to Create Online Courses Featuring Your Favorite Games
- Build Talk or Type Educational Games on TinyTap
- How to Create Your Own Educational Games With TinyTap – Getting Started
- Making Your Educational Games Look Good With TinyTap
- Create an Educational Puzzle Game With TinyTap
- Say Something – A Fun and Easy TinyTap Activity
- Use TinyTap to Create Interactive Lessons and Games With Soundboards
- Create TinyTap Educational Games With Houdini Effects, Videos, and More
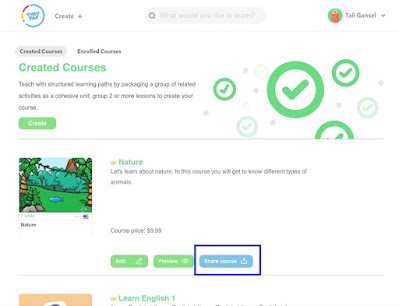
Disclosure: TinyTap is currently an advertiser on FreeTech4Teachers.comIn last week’s post about using TinyTap to create your own online courses I mentioned that there is an option to sell your courses for use beyond your classroom. That’s what today’s post is all about. In this post I’ll outline why you would want to create courses for sale, how to do it, and the differences between the TinyTap app and the Tiny Courses app. Reasons to Create TinyTap Courses for SaleIf you’re already using TinyTap to create educational games and courses for your students to use for free, it’s easy to also create courses for sale to others through TinyTap’s platform. You set the prices for your courses and you earn 80% of all revenue generated by your courses. That’s a much better percentage than other platforms that teachers use to sell courses and materials. And TinyTap doesn’t charge you anything to create courses for sale. In other words, they don’t earn anything from you and your courses unless you do. In the last week fuel prices have skyrocketed in my area. Likewise, a trip to the grocery store costs a lot more than it did a year ago. I don’t know about you, but my salary hasn’t correspondingly increased. Creating and selling TinyTap courses could be a good way to cover the losses inflicted by inflation. How to Create TinyTap Courses for SaleThe basics of creating a TinyTap course to sell are largely the same as they are for creating a free course. Those basics are covered in last week’s blog post and in this video that shows you how to create an online course in five minutes or less. To develop a course to sell through TinyTap sign into your TinyTap account in your web browser then click “create course.” Then you’ll go through the simple steps of writing a course title, description, goals, identifying the target age for the course, and placing it into a content category. Those steps are the same whether the course is free or paid. If you want to sell your course, you’ll simply click the “premium” button and set a price before publishing your TinyTap course. See my screenshot below for more details.You may have noticed in last week’s blog post and tutorial video about creating courses that there is a field in the course builder where you can include a promotional video for your course. If you’re creating a course for sale, I’d highly recommend including a short promotional video. The video does need to be hosted on YouTube or Vimeo in order to include it in your course description. I’ll share more about creating promotional videos a little later in this post. For now, the screenshot below shows you where to place your video in the course builder.Where Your Courses Are SoldCourses that you mark as premium are available for anyone to purchase through Tiny Courses. Tiny Courses makes your course available for use in the web browser, on the Tiny Courses iPad app, and on the Tiny Courses Android app. While anyone could purchase a course, the target audience for Tiny Courses is parents who are looking for educational activities their children can do at home or anywhere they have access to Tiny Courses. The courses are a one-time purchase, access never expires, and there is a 30 day money-back guarantee. See the screenshot below for details on where purchased courses are found in the web browser at https://www.tinytap.com/reports/courses/purchased/ Every course that you create for sale through Tiny Courses is given its own Tiny Courses shop page. The great thing about the shop page is that it is generated for you from the information that you provide in the course builder including price, age range, number of activities, and general course information. You don’t have to worry about designing a page or dealing with the technical side of building an online shop because TinyTap does all of that for you. Take a look at this shop page for a course about seasons or this shop page for a course about the alphabet to get a sense of how the shop pages work.How to Share Your CourseThe courses you create are given their own course shop pages. You can find the link to those pages in your account under “courses.” There you’ll see a list of the courses you’ve created. Select the course that you want to share and you’ll see a “share” button at the bottom of the screen. Clicking the share button will generate the URL for your course shop page. You can place that URL anywhere that you would normally share links including in an email to prospective course buyers who can then purchase and enroll their children in your course (more about that below). See the screenshots below for details on where to find your course shop pages. Three Tips for Marketing Your TinyTap CoursesI’ve created and sold online courses for the last decade. In fact, I’ve hosted courses about marketing teaching materials and online courses. Here are my three top tips for marketing courses that you create for sale. Create a video about your course. It doesn’t have to be fancy. It should be concise. People want to know the highlights of what they’re getting when they purchase your course. Create a 45-60 second screencast of your course’s highlights and at the end include a call to action like, “click enroll to get started.” I use Screencast-o-matic to create my videos, but there are other good choices like Screencastify, iMovie, and WeVideo available. Send email about your course offerings! I can’t stress enough how important a good email list is. Through your email list you can send messages to people who have expressed some level of interest in what you offer and direct them right to your course. This is so much more effective than posting on social media and hoping that the algorithm of the day puts your message in front of the right people.Important note about email: It should go without saying, but don’t use your school email address to email your students’ parents about courses you’re selling. Instead, build an email list outside of your school that people have opted into. Try a service like ConvertKit that lets you create landing pages for people to use to sign-up for your mailing list. ConvertKit’s free plan lets you have 1,000 email subscribers. Don’t be afraid to tell people about your courses. After a decade of selling courses, this is something that I’m still working on. Unless you’re a natural salesperson, you’re probably like me and a bit worried about being “that person” who is always selling something. The rule of thumb is that it takes at least seven touches to make a sale. In other words, sending one email or posting a few times on social media won’t get you the results you want. Use a variety of those methods to get those seven touches and then keep going because each new contact will also need seven touches before a sale. A note about sharing on social media: when you share a link to your course on social media a thumbnail image and description preview are automatically included by TinyTap. How courses are purchasedTiny Courses are purchased through individual shop pages. The purchases are one-time purchases and course access doesn’t expire. Parents simply click the “enroll my child” button and complete a short two-step process to have their children access the course. Get Started Building and Selling Your Courses!Head to the course creator page to get started building a Tiny course to sell. Then click “get started” and log into your TinyTap account to build your course. Follow the steps I outlined in this tutorial but don’t forget to click “premium” to make your course available in Tiny Courses. Watch this video to see how I would build and market a Tiny course for sale. Learn More About TinyTap!Over the last nine weeks I’ve shared a lot of information about creating educational games, lessons, and courses with TinyTap. All of those previous blog posts are listed below.Use TinyTap to Create Online Courses Featuring Your Favorite GamesBuild Talk or Type Educational Games on TinyTapHow to Create Your Own Educational Games With TinyTap – Getting StartedMaking Your Educational Games Look Good With TinyTapCreate an Educational Puzzle Game With TinyTapSay Something – A Fun and Easy TinyTap ActivityUse TinyTap to Create Interactive Lessons and Games With SoundboardsCreate TinyTap Educational Games With Houdini Effects, Videos, and MoreAre you a tech coach or media specialist looking for some new ideas to share with your colleagues? If so, 50 Tech Tuesday Tips is an eBook you need. You can get it right here.
Sorry, the comment form is closed at this time.