
09 Sep Create, Reflect, Outline, Create – A Video Creation Process
On page 76 of Invent To Learn Stager and Martinez write, “The movie can be done without a storyboard or script, the 3D object may not be the most precisely planned out, but the point is to create something that can be shared and talked about.” Later in the same chapter they advise avoiding overteaching planning as it can stifle creativity in some students.
For years now my outline for student video projects has been influenced by reading that passage in Invent to Learn.
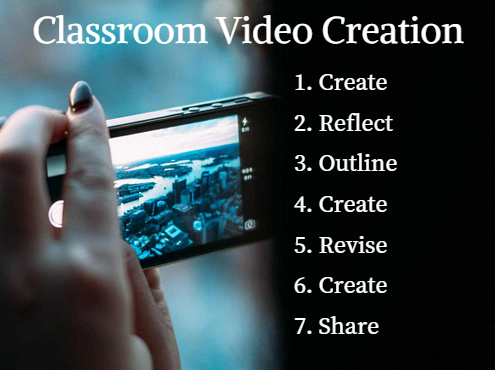
1. Create – let the kids have a crack at making their videos. If some students have a nature inclined to planning first, let them. If others want to jump into the process right away, that’s great too. When I make screencast videos I don’t always plan them first, I just make them. If the first attempt doesn’t result in a polished work, that’s okay because now I know what I need to change for the next attempt.
2. Reflect – take a look at what was made. What is good about it? What needs to be changed?
3. Outline – create that outline or storyboard now that you know what to keep and what to change.
4. Create – this is the second attempt at the video.
5. Revise – take a look at what the second attempt at creation yielded. Revise the outline again for the next round of editing or re-shooting.
6. Create – this is the second round of editing or it could be a complete re-shoot of a video.
7. Share – when you’re happy with your video (it may take many more rounds of steps 5 and 6) share it with the world. Share it on Next Vista for Learning, YouTube, your classroom blog, or anywhere else that there is a potential audience for your work.
On page 76 of Invent To Learn Stager and Martinez write, “The movie can be done without a storyboard or script, the 3D object may not be the most precisely planned out, but the point is to create something that can be shared and talked about.” Later in the same chapter they advise avoiding overteaching planning as it can stifle creativity in some students. For years now my outline for student video projects has been influenced by reading that passage in Invent to Learn. We’re well aware that most students when given some time will figure out how to use a video editing tool. We don’t need to spend lots of time teaching that as most of our kids will be biting their tongues as we fumble with things they already know how do or at least feel confident that they can do. Therefore, I skip the “how to use iMovie” with students and jump right to the creation phase. The whole process is outlined below. (Bear in mind, this is a process for videos that will have a finished length of five minutes or less).1. Create – let the kids have a crack at making their videos. If some students have a nature inclined to planning first, let them. If others want to jump into the process right away, that’s great too. When I make screencast videos I don’t always plan them first, I just make them. If the first attempt doesn’t result in a polished work, that’s okay because now I know what I need to change for the next attempt.2. Reflect – take a look at what was made. What is good about it? What needs to be changed?3. Outline – create that outline or storyboard now that you know what to keep and what to change.4. Create – this is the second attempt at the video.5. Revise – take a look at what the second attempt at creation yielded. Revise the outline again for the next round of editing or re-shooting.6. Create – this is the second round of editing or it could be a complete re-shoot of a video.7. Share – when you’re happy with your video (it may take many more rounds of steps 5 and 6) share it with the world. Share it on Next Vista for Learning, YouTube, your classroom blog, or anywhere else that there is a potential audience for your work. Free Technology For Teachers, Gary Stage, how to, Invent to Learn, Sylvia Martinez, video creation, Video EditingRead More
Sorry, the comment form is closed at this time.