24 Jan Create an Educational Puzzle Game With TinyTap
Disclosure: TinyTap is currently an advertiser on FreeTech4Teachers.com.
Over the last two weeks I covered the basics of creating an educational game with TinyTap and how to make it look good. This week I’m going to start diving into some of the more interesting game types and formats available in TinyTap. The first of those is the puzzle game format.
Ideas and Examples for Puzzle Games
When you read “puzzle game” you might automatically think about jigsaw puzzles, I know that I do. You can certainly make a jigsaw puzzle game with TinyTap, but there are a lot of other ways to use the puzzle game creation tools in TinyTap.
With the TinyTap puzzle game creation tools you can create games in which students drag and drop game pieces together. By doing this you can create games in which students match letters to pictures as is done in this game or games in which students place animals onto the countries, states, or provinces that they represent as will be done in the game that I create.
Another way to think about using the TinyTap puzzle game creator is to have students complete a counting activity. In this style of game students will drag a sequence of objects into position in order to count them. Give it a try in this counting trains game.
There is probably an infinite number of identification games that you could create with TinyTap’s puzzle game tools. A few that I can think of are games to identify birds and other wildlife, games to practice identifying parts of speech, and games to practice identifying parts of a computer system. And for some reason that I can’t identify when I thought of making a puzzle game for practicing identifying things, I thought of how helpful it would have been to have an identification game when I was taking an anatomy and physiology course twenty something years ago.
And because each game is created on a slide-by-slide basis, it is possible to combine elements of counting, sorting, matching, and object alignment into one comprehensive game. Take a look at this game about fruits and vegetables as an example of using all of the puzzle tools in one game.
How to Make a Puzzle Game in TinyTap
For this example, I’m going to create a game in which I have students drag and drop flags onto the New England states that they represent. To begin, just like creating any other game in TinyTap I’ll start by adding a title slide for my game. As a reminder, you can use any of the styles, layouts, and creation packs to design the slides in game. This video that I published last week shows you how to use those design tools.
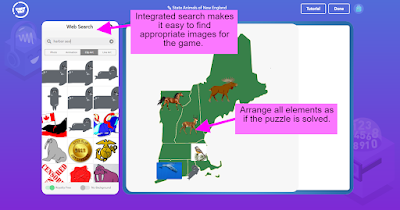
The next step of the puzzle game design process is probably the most important one to get right at the start. Put all of the pieces together in the places where they should be when the puzzle is solved. In other words, think of it like making a jigsaw puzzle by cutting up a picture. Another way to think about it is creating the answer key before writing the quiz. In this case I’ll be putting a map of New England on my slide and then placing the corresponding state animals on that map. See my screenshot below for more details.
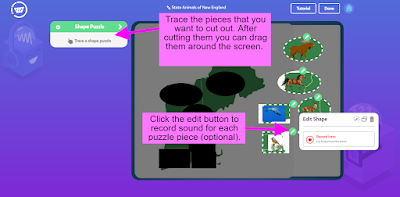
After arranging the elements of the game slide into the places where they represent the correct answers it’s time to choose an activity type. The activity type that I’m using for this game is “shape puzzle.” After selecting the shape puzzle option it is time to cut out the pieces that will be dragged into position when students play the game. Pieces are cut by using the tracing tools in TinyTap. As each piece is traced and cut it should be dragged over to the side or bottom of the slide to create a bank of pieces. It’s from that bank that students will select pieces to move during the game. It’s also important to note that you can record audio to accompany each puzzle piece that you create. In my game I simply read aloud the names of the animals in my puzzle pieces. Take a look at my screenshots below for more detail.
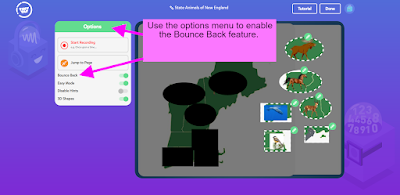
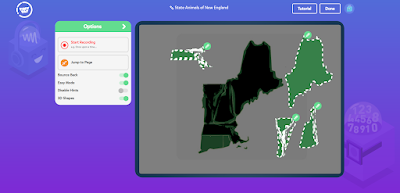
After cutting out the game pieces and putting them into a bank, you could simply click “Done” and the game would be ready to play. However, there is more that you can do to enhance the gameplay experience for your students. Those things are found by opening the “options” menu when viewing the shape puzzle editor. In that menu you’ll find options for recording audio. I highly recommend using that option to provide your students with some instructions or clues for playing the game. You can also enable the following gameplay features:
- Bounce Back – this option bounces the pieces back to the bank if they’re not placed in the proper place.
- Easy Mode – this option enables the students to see the puzzle completed at the start and then scatters the pieces to start the game. (only available on iPad)
- Disable Hints – this is a pretty self explanatory option. (only available on iPad)
- Hints – when the guided play mode is on, this will give students three tries before the piece is automatically placed in the correct spot. (only available on iPad)
- 3D – this option displays the pieces in 3D or makes them appear to pop out from the screen.
At this point it’s a good idea to preview the game before going any further. To preview the game all you have to do is click on the play icon just to the left of the slide. As soon as you click that the game will load and it can be played just like a student would see it.
It is also possible to create a puzzle game that doesn’t use a bank of answer choices. TinyTap calls this alternative puzzle type a “mixed puzzle.” Mixed puzzles are great for creating games in which students match two or more pieces together to create a complete image. For example, in my game I created a mixed puzzle in which students have to reassemble the map of New England states. To that I duplicated the slide from earlier and then removed my cut out pieces. Then I used the tracing tool to trace each state and made them their own pieces of the puzzle.
When you create a mixed puzzle game, as I did with the map of New England, it could be very helpful to your students to have “easy mode” enabled so that they can see the full picture before having to try to piece it together. That’s a lot when you put together a physical jigsaw puzzle and look at the picture on the box to help get yourself started.
More Puzzle Games Inspiration and a Tutorial
The folks at TinyTap were kind enough to put together a collection of puzzle games that anyone can try right now. So if you’re looking for ideas for making educational games for your students, take a look at following examples:
- Building a sentence puzzle.
- Letters and Picture Word Puzzle.
- Matching numbers to ten.
- Matching numbers to amounts.
- A Winter Picture Puzzle (created using the automated shapes cutouts).
- Body parts puzzle with Mr. Potato Head.
- Counting Trains.
- Fruits & Vegetables.
Finally, you can see the whole process that I outlined above demonstrated in this tutorial video.
Disclosure: TinyTap is currently an advertiser on FreeTech4Teachers.com.Over the last two weeks I covered the basics of creating an educational game with TinyTap and how to make it look good. This week I’m going to start diving into some of the more interesting game types and formats available in TinyTap. The first of those is the puzzle game format. Ideas and Examples for Puzzle GamesWhen you read “puzzle game” you might automatically think about jigsaw puzzles, I know that I do. You can certainly make a jigsaw puzzle game with TinyTap, but there are a lot of other ways to use the puzzle game creation tools in TinyTap. With the TinyTap puzzle game creation tools you can create games in which students drag and drop game pieces together. By doing this you can create games in which students match letters to pictures as is done in this game or games in which students place animals onto the countries, states, or provinces that they represent as will be done in the game that I create. Another way to think about using the TinyTap puzzle game creator is to have students complete a counting activity. In this style of game students will drag a sequence of objects into position in order to count them. Give it a try in this counting trains game. There is probably an infinite number of identification games that you could create with TinyTap’s puzzle game tools. A few that I can think of are games to identify birds and other wildlife, games to practice identifying parts of speech, and games to practice identifying parts of a computer system. And for some reason that I can’t identify when I thought of making a puzzle game for practicing identifying things, I thought of how helpful it would have been to have an identification game when I was taking an anatomy and physiology course twenty something years ago. And because each game is created on a slide-by-slide basis, it is possible to combine elements of counting, sorting, matching, and object alignment into one comprehensive game. Take a look at this game about fruits and vegetables as an example of using all of the puzzle tools in one game. How to Make a Puzzle Game in TinyTapFor this example, I’m going to create a game in which I have students drag and drop flags onto the New England states that they represent. To begin, just like creating any other game in TinyTap I’ll start by adding a title slide for my game. As a reminder, you can use any of the styles, layouts, and creation packs to design the slides in game. This video that I published last week shows you how to use those design tools. The next step of the puzzle game design process is probably the most important one to get right at the start. Put all of the pieces together in the places where they should be when the puzzle is solved. In other words, think of it like making a jigsaw puzzle by cutting up a picture. Another way to think about it is creating the answer key before writing the quiz. In this case I’ll be putting a map of New England on my slide and then placing the corresponding state animals on that map. See my screenshot below for more details.After arranging the elements of the game slide into the places where they represent the correct answers it’s time to choose an activity type. The activity type that I’m using for this game is “shape puzzle.” After selecting the shape puzzle option it is time to cut out the pieces that will be dragged into position when students play the game. Pieces are cut by using the tracing tools in TinyTap. As each piece is traced and cut it should be dragged over to the side or bottom of the slide to create a bank of pieces. It’s from that bank that students will select pieces to move during the game. It’s also important to note that you can record audio to accompany each puzzle piece that you create. In my game I simply read aloud the names of the animals in my puzzle pieces. Take a look at my screenshots below for more detail.After cutting out the game pieces and putting them into a bank, you could simply click “Done” and the game would be ready to play. However, there is more that you can do to enhance the gameplay experience for your students. Those things are found by opening the “options” menu when viewing the shape puzzle editor. In that menu you’ll find options for recording audio. I highly recommend using that option to provide your students with some instructions or clues for playing the game. You can also enable the following gameplay features:Bounce Back – this option bounces the pieces back to the bank if they’re not placed in the proper place.Easy Mode – this option enables the students to see the puzzle completed at the start and then scatters the pieces to start the game. (only available on iPad)Disable Hints – this is a pretty self explanatory option. (only available on iPad)Hints – when the guided play mode is on, this will give students three tries before the piece is automatically placed in the correct spot. (only available on iPad)3D – this option displays the pieces in 3D or makes them appear to pop out from the screen.At this point it’s a good idea to preview the game before going any further. To preview the game all you have to do is click on the play icon just to the left of the slide. As soon as you click that the game will load and it can be played just like a student would see it. It is also possible to create a puzzle game that doesn’t use a bank of answer choices. TinyTap calls this alternative puzzle type a “mixed puzzle.” Mixed puzzles are great for creating games in which students match two or more pieces together to create a complete image. For example, in my game I created a mixed puzzle in which students have to reassemble the map of New England states. To that I duplicated the slide from earlier and then removed my cut out pieces. Then I used the tracing tool to trace each state and made them their own pieces of the puzzle. When you create a mixed puzzle game, as I did with the map of New England, it could be very helpful to your students to have “easy mode” enabled so that they can see the full picture before having to try to piece it together. That’s a lot when you put together a physical jigsaw puzzle and look at the picture on the box to help get yourself started.More Puzzle Games Inspiration and a TutorialThe folks at TinyTap were kind enough to put together a collection of puzzle games that anyone can try right now. So if you’re looking for ideas for making educational games for your students, take a look at following examples:Building a sentence puzzle.Letters and Picture Word Puzzle. Matching numbers to ten.Matching numbers to amounts.A Winter Picture Puzzle (created using the automated shapes cutouts).Body parts puzzle with Mr. Potato Head.Counting Trains.Fruits & Vegetables. Finally, you can see the whole process that I outlined above demonstrated in this tutorial video.
Sorry, the comment form is closed at this time.