
25 Oct BookWidgets – Create Unique Online Activities for Your Students

BookWidgets is a service for creating interactive online activities. It has been on my radar for a while and last week I finally gave it a try. I wish I had tried it sooner.
BookWidgets lets you create online interactive activities for your students to complete on any device. One of the best things about it is that it offers more than thirty question types that you can choose to insert into your activities. In other words, you can build in enough question variety and activity variety that students won’t get bored by just answering the same types of questions over and over.
Unique Online Activities
One of the first things I noticed when I started to create a BookWidgets activity is that there are some activity templates that I haven’t found in any similar platforms. A few that stand out include split whiteboards, split worksheets, and active plotting.
The split whiteboards template lets you create an activity in which students read text on one side of the screen and use freehand drawing and writing on the other side of the screen to answer questions. I can envision a lot of mathematics teachers using that option. The active plotting template is another that math teachers will like. It lets you create a graphing activity that your students complete online. The neat thing about it is that you can watch their work in real time. The split worksheets template, like the split whiteboard template, shows students text on one side of the screen and questions on the other side.
There are many other interesting templates and widgets that you can use in the creation of online activities for your students to complete via BookWidgets. There are templates for before and after comparisons, templates for adding interactive markers to images, and templates for showing a sequence of animation and video frames.
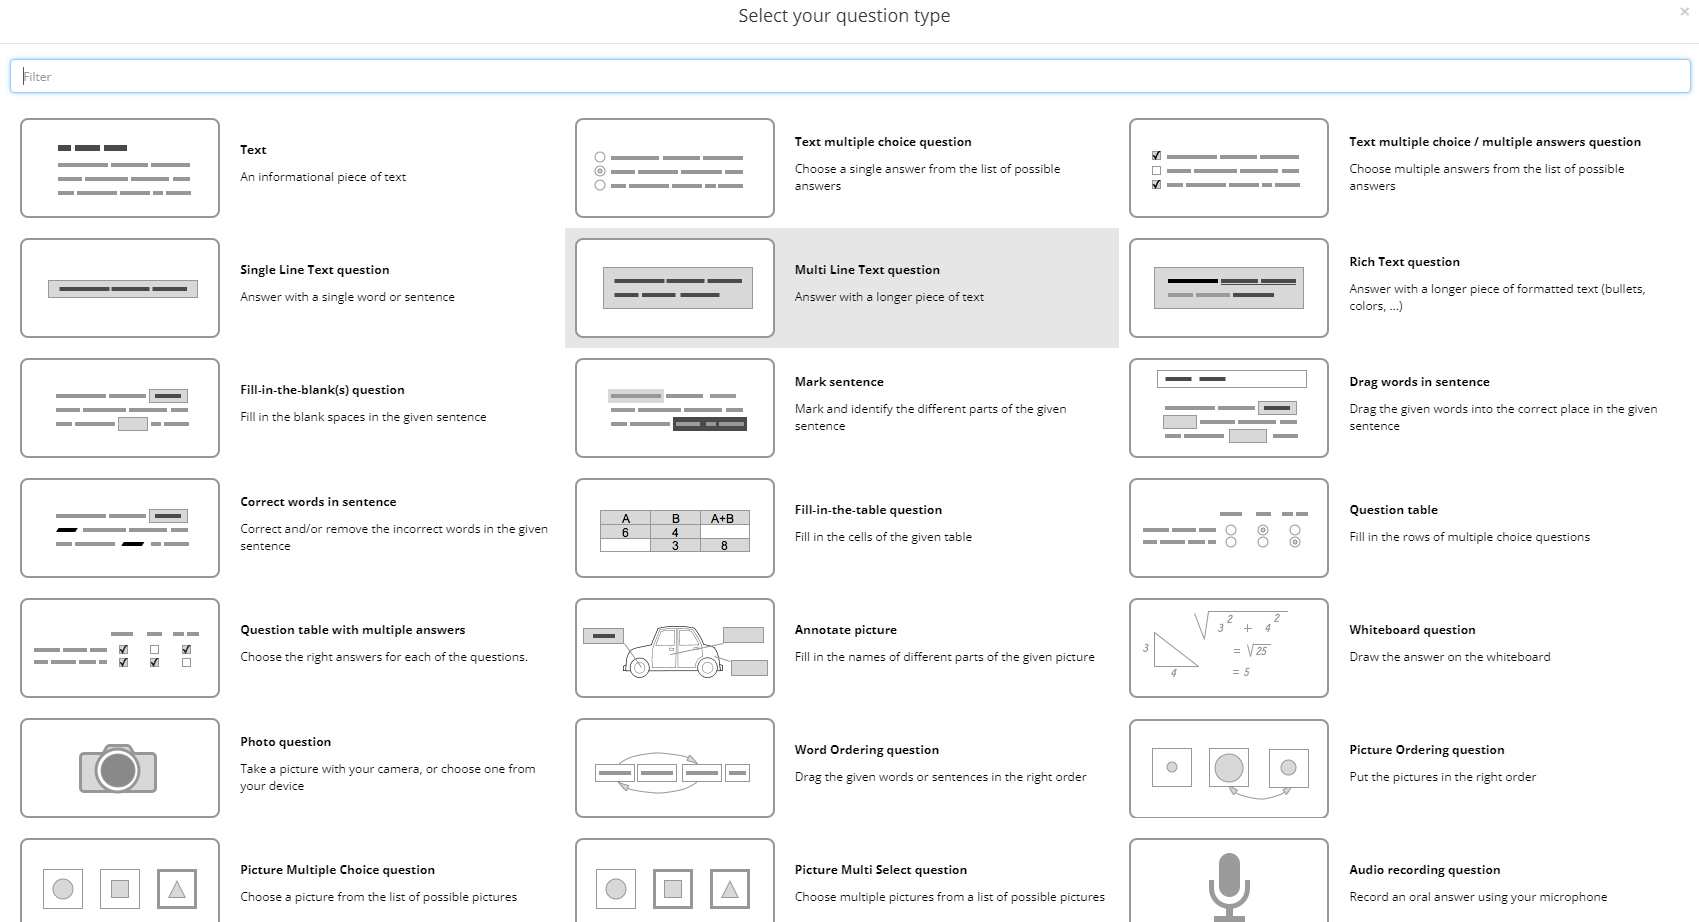
My screenshot below shows you some of the many types of templates that you can use to create online activities in BookWidgets.

View Progress in Realtime!
The little camera icon next to a BookWidgets template title indicates that you can view your students’ progress in realtime. The little checkbox icon identifies templates that can be used to create activities that can be automatically scored for you.
Getting Started
Like any good educational technology service, BookWidgets provides a comprehensive set of tutorials for first-time users. But as I do whenever I try a new service, I skipped the tutorials and dove right into making an activity. I recommend doing the same as I think it’s the best way to discover how a tool will really work for you.
When you first sign into your BookWidgets account you’ll be taken to your teacher dashboard. There you’ll see a home button on the left-hand side of the screen. That’s where you’ll also find a “My Widgets” box where you can then click to create your first widget (I’d call widgets “activities” if I was in charge of naming things). When you click “create a widget” you’ll then see a menu of more than thirty widget types including the aforementioned split whiteboard widget and split worksheet widget.

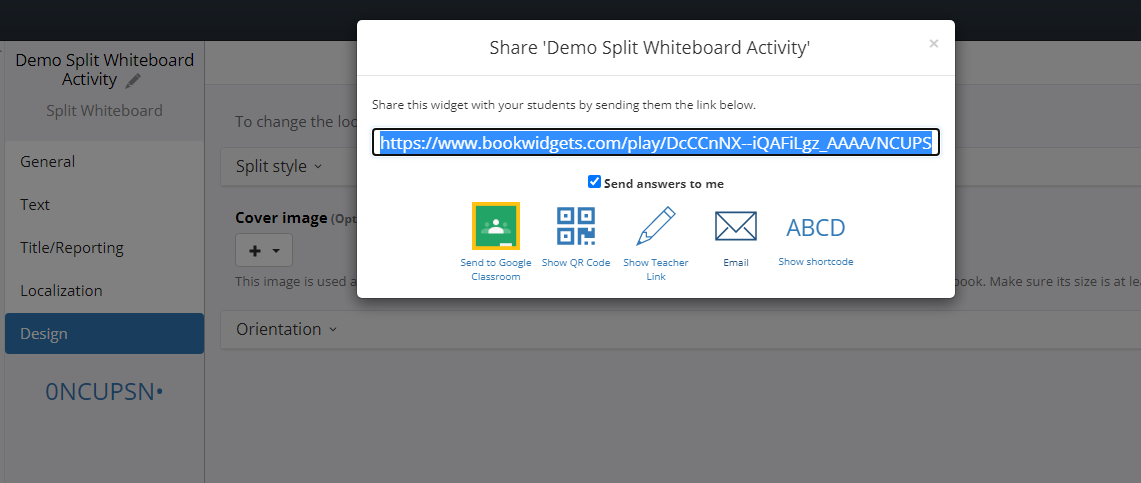
Once you’ve selected a widget type you’re ready to start customizing it for your needs. The process of customizing a widget starts the same way regardless of which one you pick. You’ll give your widget a title, choose a background image (optional), and then select your sharing settings. From there your next steps are to add content to your widget. If you’re using one of the quiz or other assessment widgets you’ll write your questions and create an answer key (if you want it automatically scored). If you’re using the split whiteboard widget, you’ll enter text to prompt your students. Take a look at my screenshot below to see the split whiteboard widget in action.

As you can see in my screenshot above, the split whiteboard widget includes the option to use video as part of the prompt that students respond to on the whiteboard.
Assigning Activities and Viewing Progress
There are a few ways that you can distribute your BookWidget to students. The simplest way is to simply grab the unique link assigned to your widget and share it with your students wherever you normally share links. Another option is to import your Google Classroom roster and share your widgets as assignments in Google Classroom. It’s also possible to connect to Microsoft Teams, Moodle, Schoology, and Canvas. And if your students use tablets or phones in your classroom, you might want to use the QR code option to share activities with them.
Students can complete BookWidget activities in the web browser on any device. When they’ve completed the activity they’ll simply tap or click the envelope icon in the upper-right corner of the screen to submit the assignment. Students don’t need to have email addresses in order to complete BookWidget activities. Once they’ve submitted a completed activity, you can view your students’ responses by simply clicking the “Grades & Reporting” option in your teacher dashboard then clicking “student work” where you can then view individual work and score it. You can also view a summary of submissions in the “Grades & Reporting” field.
As I mentioned above, it is possible to see your students’ work in progress before they have submitted it for your review. To do that just connect your Google Classroom account and click on “Live” in your teacher dashboard to see which of your students are working on an activity and how much they’ve done.
Options for Every Teacher
I could probably write one thousand words just about the customization options available to teachers creating BookWidgets activities. Suffice it to say, there is something for everyone. You can format your text for left-to-right or right-to-left. You can choose from sixteen language options or add your own custom translation. Pages can be formatted in landscape or portrait mode.
More than thirty question types and response types are available to add to BookWidgets activities. In this blog post I’ve only scratched the surface of what’s available. Some of the other notable features include the ability to record audio responses to questions, annotate images and drawings as responses, take and or upload image responses, and a slew of matching and ordering question formats. Math and science teachers will be pleased to learn that BookWidgets even has tools for authoring questions with equations and for creating responses with equations.
And for even more examples of using split worksheets and split whiteboards take a look at this example called Kung Fu Grasshoppers and this one of an online maze.
Disclosure: BookWidgets is an advertiser on FreeTech4Teachers.com.BookWidgets is a service for creating interactive online activities. It has been on my radar for a while and last week I finally gave it a try. I wish I had tried it sooner. BookWidgets lets you create online interactive activities for your students to complete on any device. One of the best things about it is that it offers more than thirty question types that you can choose to insert into your activities. In other words, you can build in enough question variety and activity variety that students won’t get bored by just answering the same types of questions over and over. Unique Online ActivitiesOne of the first things I noticed when I started to create a BookWidgets activity is that there are some activity templates that I haven’t found in any similar platforms. A few that stand out include split whiteboards, split worksheets, and active plotting. The split whiteboards template lets you create an activity in which students read text on one side of the screen and use freehand drawing and writing on the other side of the screen to answer questions. I can envision a lot of mathematics teachers using that option. The active plotting template is another that math teachers will like. It lets you create a graphing activity that your students complete online. The neat thing about it is that you can watch their work in real time. The split worksheets template, like the split whiteboard template, shows students text on one side of the screen and questions on the other side. There are many other interesting templates and widgets that you can use in the creation of online activities for your students to complete via BookWidgets. There are templates for before and after comparisons, templates for adding interactive markers to images, and templates for showing a sequence of animation and video frames. My screenshot below shows you some of the many types of templates that you can use to create online activities in BookWidgets. View Progress in Realtime!The little camera icon next to a BookWidgets template title indicates that you can view your students’ progress in realtime. The little checkbox icon identifies templates that can be used to create activities that can be automatically scored for you. Getting StartedLike any good educational technology service, BookWidgets provides a comprehensive set of tutorials for first-time users. But as I do whenever I try a new service, I skipped the tutorials and dove right into making an activity. I recommend doing the same as I think it’s the best way to discover how a tool will really work for you. When you first sign into your BookWidgets account you’ll be taken to your teacher dashboard. There you’ll see a home button on the left-hand side of the screen. That’s where you’ll also find a “My Widgets” box where you can then click to create your first widget (I’d call widgets “activities” if I was in charge of naming things). When you click “create a widget” you’ll then see a menu of more than thirty widget types including the aforementioned split whiteboard widget and split worksheet widget. Once you’ve selected a widget type you’re ready to start customizing it for your needs. The process of customizing a widget starts the same way regardless of which one you pick. You’ll give your widget a title, choose a background image (optional), and then select your sharing settings. From there your next steps are to add content to your widget. If you’re using one of the quiz or other assessment widgets you’ll write your questions and create an answer key (if you want it automatically scored). If you’re using the split whiteboard widget, you’ll enter text to prompt your students. Take a look at my screenshot below to see the split whiteboard widget in action. As you can see in my screenshot above, the split whiteboard widget includes the option to use video as part of the prompt that students respond to on the whiteboard. Assigning Activities and Viewing ProgressThere are a few ways that you can distribute your BookWidget to students. The simplest way is to simply grab the unique link assigned to your widget and share it with your students wherever you normally share links. Another option is to import your Google Classroom roster and share your widgets as assignments in Google Classroom. It’s also possible to connect to Microsoft Teams, Moodle, Schoology, and Canvas. And if your students use tablets or phones in your classroom, you might want to use the QR code option to share activities with them. Students can complete BookWidget activities in the web browser on any device. When they’ve completed the activity they’ll simply tap or click the envelope icon in the upper-right corner of the screen to submit the assignment. Students don’t need to have email addresses in order to complete BookWidget activities. Once they’ve submitted a completed activity, you can view your students’ responses by simply clicking the “Grades & Reporting” option in your teacher dashboard then clicking “student work” where you can then view individual work and score it. You can also view a summary of submissions in the “Grades & Reporting” field. As I mentioned above, it is possible to see your students’ work in progress before they have submitted it for your review. To do that just connect your Google Classroom account and click on “Live” in your teacher dashboard to see which of your students are working on an activity and how much they’ve done. Options for Every TeacherI could probably write one thousand words just about the customization options available to teachers creating BookWidgets activities. Suffice it to say, there is something for everyone. You can format your text for left-to-right or right-to-left. You can choose from sixteen language options or add your own custom translation. Pages can be formatted in landscape or portrait mode. More than thirty question types and response types are available to add to BookWidgets activities. In this blog post I’ve only scratched the surface of what’s available. Some of the other notable features include the ability to record audio responses to questions, annotate images and drawings as responses, take and or upload image responses, and a slew of matching and ordering question formats. Math and science teachers will be pleased to learn that BookWidgets even has tools for authoring questions with equations and for creating responses with equations. Watch my short video below to learn how to create your first BookWidgets activity and see how your students will use it.And for even more examples of using split worksheets and split whiteboards take a look at this example called Kung Fu Grasshoppers and this one of an online maze. Disclosure: BookWidgets is an advertiser on FreeTech4Teachers.com. BookWidgets, Free Technology For Teachers, games, how to, interactive activities, Matching Games, Online Whiteboards, Online worksheets, Whiteboard ActivitiesRead More
Sorry, the comment form is closed at this time.